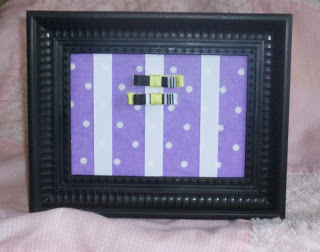
Today I am going to show you how to make a cute little clippie or mini bow holder.
These are super easy to make, it takes about 5-10 minuets and about $1 to make!
Step 1
Lay out your fabric nice side down and set the glass from your picture frame on it

Step 2
Put hot glue on the frame and glue the fabric down to the two longer sides of the glass. Make sure you pull the fabric tight.
 Step 3
Glue the shorter sides to the glass now too. I fold the corners in like you would when wrapping a gift.

When you flip it over this is what it should look like
 Step 4
Now you need three pieces of ribbon a little longer than the glass.
 Step 5
I take the paper that came in the picture frame and fold it in half and then fold the sides into the middle. This is just a template to help me get the ribbon in the center and make sure when I put them on they are evenly spaced.
 Step 6
Now lay your template down on the top of the glass and take your first piece of ribbon and set it on the middle fold. You want to glue it on to the top of the glass as close as you can get it. Do this to the top and bottom of the ribbon. Do all three pieces this way.
 This is what you should have so far
 Step 7
Now flip over your covered glass and glue the ends of your ribbon the the glass. Make sure you pull these as tight as you can. you don't want to have saggy ribbon on your holder. =)
 Step 8
Put a spot of hot glue on the four corners where the corners of your glass is going to go. You can kind of see that I'm pointing to the spot. Make sure you are fast so the glue doesn't dry.
 Step 9
Put the back of the frame on. I put some hot glue on the back and then close the little latch thing so that it's glued in place.
 Ta Da! Now just add your cute little clippies!

You can also use scrapbook paper instead of fabric. If you are going to do it this way just glue the ribbon in place on the front of the glass and then trim it. Put your scrap paper in the frame and you are done! This way too you can change the paper as your little ones room changes!
If anything is unclear please feel free to ask!
Thanks for looking and good luck!
- Ally
- Picture frame (I found some at the dollar store)
- scrap of fabric big enough to cover the glass
- Scissors
- Hot glue gun and glue
- Ribbon
Step 1
Lay out your fabric nice side down and set the glass from your picture frame on it

Step 2
Put hot glue on the frame and glue the fabric down to the two longer sides of the glass. Make sure you pull the fabric tight.
 Step 3
Glue the shorter sides to the glass now too. I fold the corners in like you would when wrapping a gift.

When you flip it over this is what it should look like
 Step 4
Now you need three pieces of ribbon a little longer than the glass.
 Step 5
I take the paper that came in the picture frame and fold it in half and then fold the sides into the middle. This is just a template to help me get the ribbon in the center and make sure when I put them on they are evenly spaced.
 Step 6
Now lay your template down on the top of the glass and take your first piece of ribbon and set it on the middle fold. You want to glue it on to the top of the glass as close as you can get it. Do this to the top and bottom of the ribbon. Do all three pieces this way.
 This is what you should have so far
 Step 7
Now flip over your covered glass and glue the ends of your ribbon the the glass. Make sure you pull these as tight as you can. you don't want to have saggy ribbon on your holder. =)
 Step 8
Put a spot of hot glue on the four corners where the corners of your glass is going to go. You can kind of see that I'm pointing to the spot. Make sure you are fast so the glue doesn't dry.
 Step 9
Put the back of the frame on. I put some hot glue on the back and then close the little latch thing so that it's glued in place.
 Ta Da! Now just add your cute little clippies!
You can also use scrapbook paper instead of fabric. If you are going to do it this way just glue the ribbon in place on the front of the glass and then trim it. Put your scrap paper in the frame and you are done! This way too you can change the paper as your little ones room changes!
If anything is unclear please feel free to ask!
Thanks for looking and good luck!
- Ally


What a fun idea, thanks for the tutorial!
ReplyDeleteGood idea! I've never seen one like that before. Thank you for sharing.
ReplyDelete